Hi, this is Sushant from the Minma, Inc. tech-team and today, I would like to introduce you to Apache Airflow, an open-source workflow orchestration platform implemented by Airbnb. The aim of this post is to provide a tutorial on using Airflow to implement a simple pipeline.
The old days
Our company was founded in 2011. Back then, our system was very simple. We had one database supported by a single django server. Since our user base was very small, our requirements were simple, and thus, our scheduled batch jobs were also very straightforward. All we had were a few small python scripts scheduled by cron, and at that time, this was all we needed.
At curama.jp, we have a lot of scheduled jobs, from sending reminder emails to our users, updating statistics for our vendors (service providers), performing ETL for analytics, and so on.
As our company grew from supporting a few hundred vendors, to a few thousands, our batch jobs also started growing in complexity. As years went by, our scheduled jobs started to become more and more complicated and we started having a few troubles:
Logging and Profiling: Since our tasks were all scheduled by cron, we had to manually log in to the batch server, go through the logs and check if our tasks were running as they were supposed to. Since we didn't have a built-in logging system, we had to code the logging commands in each of our scripts manually. And with no profiling feature, we also had no idea how long our batch jobs were taking every run.
Notification on failure: When we were using cron, we had not designed our scripts to send notifications when a job failed. We had to check our logs frequently to make sure our batch jobs weren't failing. It was time consuming and inefficient to go through our logs daily just to make sure nothing was going wrong.
Task Dependencies: Some of our tasks had dependencies amongst them. We had dependencies like "Task A must run only if Task B succeeds", "Task F should run when Tasks D, E and F succeed", "it's ok to run Tasks X, Y, Z" in parallel, "if Condition A holds true, run task M, else run task N", etc. With our cron jobs, we had to program these dependencies inside the scripts and as a result, our code was becoming very complex by each line of code.
Scalability: All our cron tasks were run in a single EC2 instance. To make sure two jobs didn't fight for resources, we manually scheduled all of our jobs such that no two job runs overlapped. As the number of batch jobs started growing, it was becoming harder to keep this constraint intact.
After searching for a tool that would make managing our batch jobs easier, we stumbled across Airbnb's open source workflow management platform, Apache Airflow.
Quoting the Apache Airflow docs:
Airflow is a platform to programmatically author, schedule and monitor workflows.
Use airflow to author workflows as directed acyclic graphs (DAGs) of tasks. The airflow scheduler executes your tasks on an array of workers while following the specified dependencies. Rich command line utilities make performing complex surgeries on DAGs a snap. The rich user interface makes it easy to visualize pipelines running in production, monitor progress, and troubleshoot issues when needed.
Apache Airflow solved most of our problems out-of-the-box. The built-in logging and profiling helped us monitor our tasks and made debugging easier if something went wrong. The rich user interface allowed us to visualize tasks and their dependencies, the customization options allowed us to easily send notifications when something unexpected happened, support for Celery gave us the option of scaling, if we ever found that running on a single machine was reaching its limits.
Airflow Concepts:
a. DAG (Directed Acyclic Graph):
A DAG is the unit of a single workflow in Airflow. It represents a graph of related tasks required to accomplish a certain job.
b. Operators & Tasks:
Operators are Classes that dictate how something gets done in a DAG.
- BashOperator: Executes a bash command
- PostgresOperator: Executes a SQL command or script in Postgres
- PythonOperator: Executes a python callable (function)
An instance of an Operator is called a Task. Two task instances may use same Operator but, they are never the same.
Implement a simple pipeline using Airflow
To illustrate how easy it is to build a pipeline with airflow, we are going to build a simple pipeline for creating a hawaiian pizza.
At the end of this tutorial we will have implemented a DAG (workflow) that looks something like this.
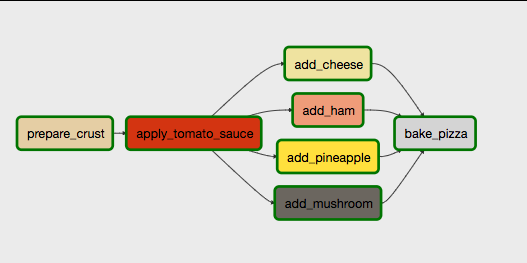
The graph in the picture represents a DAG and all the small rectangular boxes are tasks. As you can see, just by looking at the DAG, we can figure out how the different tasks combine to complete the pipeline.
For our simulation, we will make the following assumptions:
- A pizza in our example is a text file.
- At every step in the pipeline, some text will be appended to the file.
The point is that at each stage of the pipeline, the corresponding operator performs some action on the pizza, and once all the steps are complete, our pizza (text file) will have the desired crust, sauce, toppings, etc.
Setup Airflow:
Create a directory for the tutorial.
> mkdir ~/airflow_tutorialSpecify a home directory for airflow.
> export AIRFLOW_HOME=~/airflow_tutorialInstall airflow
> pip install apache-airflowInitialize airflow
> cd ~/airflow_tutorial> airflow initdbStart the webserver
> airflow webserver -p 8080Once the webserver starts, if you go to http://localhost:8080, you should be able to see a screen similar to this.
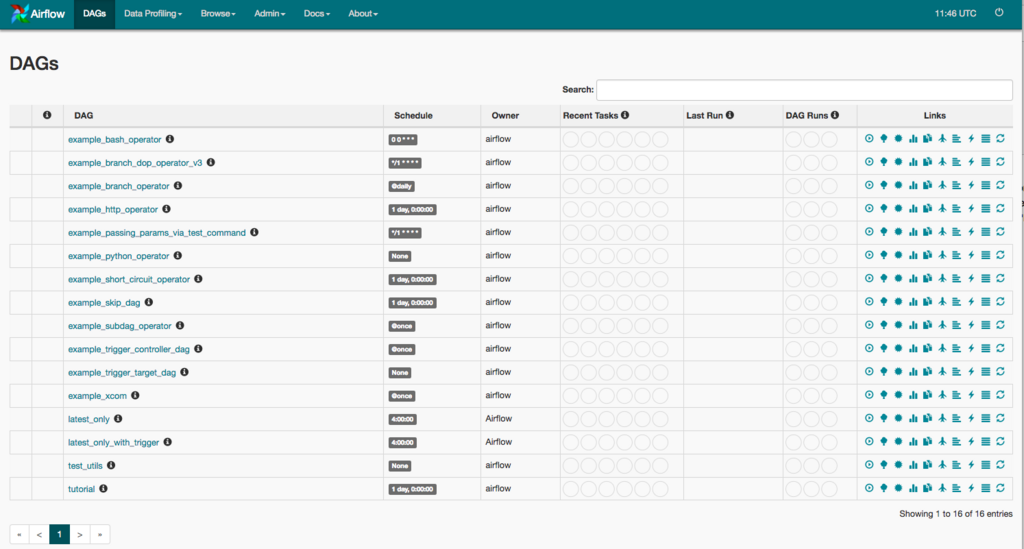
This page shows all the tasks managed by airflow. The ones shown by default are the example DAGs packaged with airflow. You can disable these by changing the
load_examplessetting to False inairflow.cfgfile.Configuration options
When you first use the
airflow initcommand, airflow creates anairflow.cfgfile in theAIRFLOW_HOMEdirectory. There are various configuration options available to fit different needs. For more detailed configuration options check out this link. For this example, we are just going to go with the default configuration.
Setup Directories
For this example we are going to store our dags in ~/airflow_tutorial/dags directory. Make sure that the dags_folder setting in airflow.cfg is set to the full path of ~/airflow_tutorial/dags.
Then create the dags directory as follows:
mkdir ~/airflow_tutorial/dags
touch ~/airflow_tutorial/dags/__init__.py
We are going to create custom operators to create our pizza. So lets go ahead and create an operators directory inside ~/airflow_tutorial/dags.
> cd ~/airflow_tutorial/
> mkdir dags/operators
> touch ~/airflow_tutorial/dags/operators/__init__.py
Create pizza
First, let's think about what we need to create our Hawaiian pizza. For this example, we are going to create a thin-crust hawaiian pizza topped with mozzarella cheese, ham, mushroom and pineapple. So, we are going need a crust, some tomato sauce, toppings like ham, cheese, pineapple, and finally an oven to bake our pizza. To build our pizza pipeline, we are going to implement operators for each of the above.
- ThinCrustOperator to create our thin crust.
- TomatoSauceOperator to apply tomato sauce to our crust.
- MozzarellaCheeseToppingOperator, HamToppingOperator, MushroomOperator and PineappleToppingOperator to add toppings to our pizza.
- OvenOperator to bake our pizza.
Let's start with creating our ThinCrustOperator!
- Create a file named
crusts.pyinside the operators directory. - Add the following lines to
crusts.py.
import logging
from airflow.models import BaseOperator
from airflow.utils.decorators import apply_defaults
import datetime

class ThinCrustOperator(BaseOperator):
    ui_color = "#e8d4ad"   # Hex color code for visualizing the Operator.

    @apply_defaults
    def __init__(
            self,
            pizza,
            *args, **kwargs):
        self.pizza = pizza
        super(ThinCrustOperator, self).__init__(*args, **kwargs)


    def execute(self, context):
        message = "[{}] Creating thin crust.......DONE\n".format(datetime.datetime.now().isoformat())
        with open(self.pizza + ".txt", "a+") as f:
            f.write(message)
        logging.info(message)
The code above is the basic structure of an Operator. All operators in Airflow are derived from the BaseOperator class or its children. All Operators must have an execute method. This method is called when the task (remember that a task is an instance of an Operator) is run.
All our ThinCrustOperator does is open the text file (pizza in our case) and appends the text "Creating thin crust.......DONE" to it.
Note: The ui_color attribute is the hex color code for the operator. When we visualize our dags in the Airflow webserver, any task that is an instance of the ThinCrustOperator class will have that color.
Similarly, we create our TomatoSauceOperator class with code that looks like this:
import logging
from airflow.models import BaseOperator
from airflow.utils.decorators import apply_defaults
import datetime

class TomatoSauceOperator(BaseOperator):
    ui_color = "#d83c0e"    # Red for tomato sauce.

    @apply_defaults
    def __init__(
            self,
            pizza,
            *args, **kwargs):
        self.pizza = pizza
        super(TomatoSauceOperator, self).__init__(*args, **kwargs)


    def execute(self, context):
        message = "[{}] Applying tomato sauce.......DONE\n".format(datetime.datetime.now().isoformat())
        with open(self.pizza + ".txt", "a+") as f:
            f.write(message)
        logging.info(message)
As you probably have guessed, we create all the remaining operators (MozzarellaCheeseToppingOperator, HamToppingOperator, MushroomOperator, etc) with similar code. So, go ahead and implement the remaining operators similarly, and then we shall combine these operators to build our pizza pipeline.
To create our pipeline, we first need to create a file that contains our DAG object. So let's first create a file called create_hawaiian_pizza.py inside our dags folder.
A pipeline in Airflow is a DAG (Directed Acyclic Graph). Creating a DAG requires the following steps:
Create a DAG instance Inside
create_hawaiian_pizza.py, add the following code.```python from airflow import DAG from datetime import datetime, timedelta
default_args = { 'owner': 'airflow', 'depends_on_past': False, 'start_date': datetime(2018, 3, 1), 'email': ['airflow@example.com'], 'email_on_failure': False, 'email_on_retry': False, 'retries': 0, 'retry_delay': timedelta(minutes=5) }
create_hawaiian_pizza_dag = DAG( 'CreateHawaiianPizza',
default_args=default_args, schedule_interval=None ) ``` A DAG instance is created from the DAG class from Airflow. This is an object that represents a single pipeline. All tasks inside the pipeline are associated to this object. For scheduling options, check out this link.Add tasks to the DAG instance
To associate tasks to our pipeline, we need to instantiate our operators.
    pizza_instance = "my_hawaiian_pizza"

    prepare_crust = ThinCrustOperator(
        task_id="prepare_crust",
        pizza=pizza_instance,
        dag=create_hawaiian_pizza_dag
    )
    apply_tomato_sauce = TomatoSauceOperator(
        task_id="apply_tomato_sauce",
        pizza=pizza_instance,
        dag=create_hawaiian_pizza_dag
    )
    add_cheese = MozzarellaCheeseToppingOperator(
        task_id="add_cheese",
        pizza=pizza_instance,
        dag=create_hawaiian_pizza_dag
    )
    add_ham = HamToppingOperator(
        task_id="add_ham",
        pizza=pizza_instance,
        dag=create_hawaiian_pizza_dag
    )
    add_pineapple = PineappleToppingOperator(
        task_id="add_pineapple",
        pizza=pizza_instance,
        dag=create_hawaiian_pizza_dag
    )
    add_mushroom = MushroomToppingOperator(
        task_id="add_mushroom",
        pizza=pizza_instance,
        dag=create_hawaiian_pizza_dag
    )
    bake_pizza = OvenOperator(
        task_id="bake_pizza",
        pizza=pizza_instance,
        dag=create_hawaiian_pizza_dag
    )
Notice that we are passing the instance of our DAG (create_hawaiian_pizza_dag) to the operator. This is required in order to associate all our tasks to the DAG instance.
Once we have created our tasks (instances of Operators), we need to set up the dependencies between then.
Remember, we want to build a pipeline that looks like this:

So, let's first set up a few rules!
- Since we need a crust before we can apply sauce,
apply_tomato_saucecan only be executed afterprepare_crustis complete. - We want to apply our toppings only after tomato sauce is applied to the pizza. Therefore,
add_cheese,add_ham,add_pineappleandadd_mushroomcan only be executed afterapply_tomato_sauceis complete. For the toppings, we don't care about the order in which the toppings are applied. Since one topping is not dependent on the other, we can runadd_cheese,add_ham,add_pineappleandadd_mushroomin parallel. - We can only bake the pizza after all the toppings are applied. Therefore,
bake_pizzacan only be executed after ALL ofadd_cheese,add_ham,add_pineappleandadd_mushroomhave completed.
Each of these rules are implemented as follows:
Rule 1
The dependency for rule no. 1 is set as follows:
prepare_crust.set_downstream(apply_tomato_sauce)
OR
apply_tomato_sauce.set_upstream(prepare_crust)
Both the above statements perform the same function.
Additionally, to make coding easier, Airflow provides some syntactic sugar for the set_downstream and set_upstream functions. We can write the same code above as follows:
# Same as prepare_crust.set_downstream(apply_tomato_sauce)
prepare_crust >> apply_tomato_sauce

# Same as apply_tomato_sauce.set_upstream(prepare_crust)
apply_tomato_sauce << prepare_crust
Rule 2
Implementing the order for apply_tomato_sauce and the toppings is easily applied using the same >> operator as rule 1.
apply_sauce >> add_cheese
apply_sauce >> add_ham
apply_sauce >> add_pineapple
apply_sauce >> add_mushroom
The >> and << operators also take lists. So the same code above can also be written as follows:
add_toppings = [add_cheese, add_ham, add_pineapple, add_mushroom]
apply_sauce >> add_toppings
Rule 3
Finally, to make sure bake_pizza is executed after all the toppings are added, we could do something like this:
# Using the same add_toppings list from rule 2.
add_toppings >> bake_pizza
In the end, our create_hawaiian_pizza.py file should look something like this:
from airflow import DAG
from datetime import datetime, timedelta
from operators.crusts import ThinCrustOperator
from operators.oven import OvenOperator
from operators.sauces import TomatoSauceOperator
from operators.toppings import (
    MozzarellaCheeseToppingOperator,
    HamToppingOperator,
    MushroomToppingOperator,
    PineappleToppingOperator
)

default_args = {
    'owner': 'airflow',
    'depends_on_past': False,
    'start_date': datetime(2018, 3, 1),
    'email': ['airflow@example.com'],
    'email_on_failure': False,
    'email_on_retry': False,
    'retries': 0,
    'retry_delay': timedelta(minutes=5)
}

create_hawaiian_pizza_dag = DAG('CreateHawaiianPizza',  default_args=default_args, schedule_interval=None)

pizza_instance = "my_hawaiian_pizza"

prepare_crust = ThinCrustOperator(
    task_id="prepare_crust",
    pizza=pizza_instance,
    dag=create_hawaiian_pizza_dag
)

apply_sauce = TomatoSauceOperator(
    task_id="apply_tomato_sauce",
    pizza=pizza_instance,
    dag=create_hawaiian_pizza_dag
)

add_cheese = MozzarellaCheeseToppingOperator(
    task_id="add_cheese",
    pizza=pizza_instance,
    dag=create_hawaiian_pizza_dag
)
add_ham = HamToppingOperator(
    task_id="add_ham",
    pizza=pizza_instance,
    dag=create_hawaiian_pizza_dag,
)
add_pineapple = PineappleToppingOperator(
    task_id="add_pineapple",
    pizza=pizza_instance,
    dag=create_hawaiian_pizza_dag
)
add_mushroom = MushroomToppingOperator(
    task_id="add_mushroom",
    pizza=pizza_instance,
    dag=create_hawaiian_pizza_dag
)

bake_pizza = OvenOperator(
    task_id="bake_pizza",
    pizza=pizza_instance,
    dag=create_hawaiian_pizza_dag
)

add_toppings = [add_cheese, add_ham, add_mushroom, add_pineapple]
prepare_crust  >> apply_sauce >> add_toppings >> bake_pizza
And that's it! We have built our pizza pipeline. Let's check to see if it works!
Make sure the webserver and scheduler are both running. Go to http://localhost:8080 and if everything goes well, our new dag should appear in the DAGs list.

Let's try running the DAG. To do so, just click on the Trigger DAG button in the Links column.
To visualize the pipeline, CreateHawaiianPizza DAG, and in the next screen, click on Graph View to visualize the pipeline.
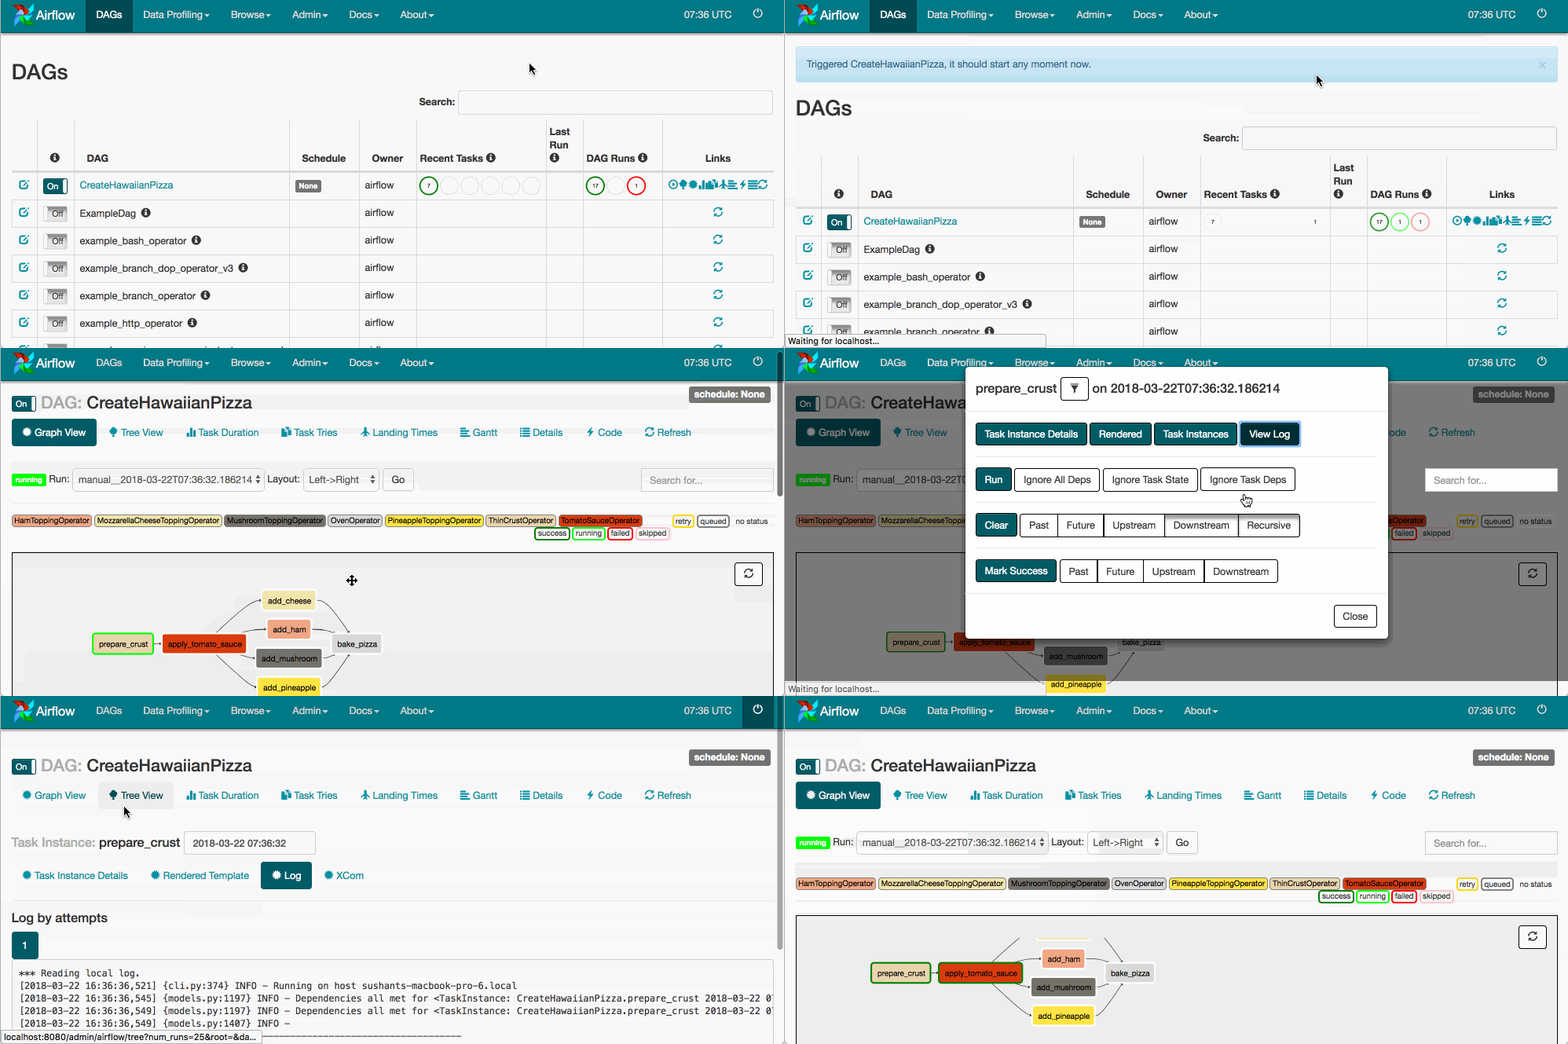
Once the DAG run is complete, we should see a my_hawaiian_pizza.txt file inside our AIRFLOW_HOME directory.

To test what happens when a task fails, let's change the ThinCrustOperator so that it throws an error like so:
def execute(self, context):
        raise Exception("Some error message here!!")
        message = "[{}] Creating thin crust.......DONE\n".format(datetime.datetime.now().isoformat())
        with open(self.pizza + ".txt", "a+") as f:
            f.write(message)
        logging.info(message)
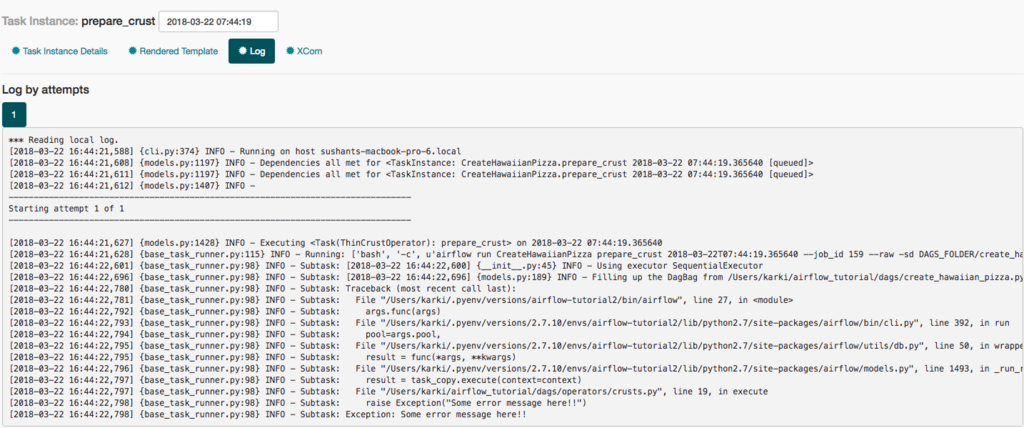
Now, if we run our DAG again, we should see that the task fails and that the exception is logged properly.
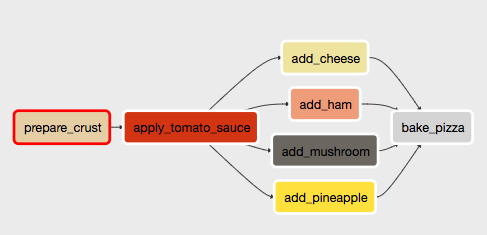
The red line around the task means that the task has failed. Now, if we click on the task and click on View Log, we should see the exception logged like this:
At curama.jp, we have been using Airflow for over a year now, we have been really satisfied with the results. Since our system is still not that complex, we have still to use Airflow to its fullest capacity. But so far, Airflow as a workflow management tool looks really promising.
This was just a simple example to demonstrate how easy it is to implement a simple workflow with Airflow. For a more in-depth look, please check out the Airflow documentation. If you are having problems using airflow, asking questions here could point you in the right direction.
PS: We are hiring! For those interested, feel free to apply here. At least conversational Japanese proficiency is required.