くらしのマーケット開発ブログ

「くらしのマーケット」を運営する、みんなのマーケット株式会社のテックブログ。積極採用中です。

Google Optimiseレポート!どんなデザインの変更ができるのか

はじめに

みんなのマーケットでUI/UXデザイナーをしているミソサクです。

Googleが提供するABテストツール「Google Optimise」を先日初めて使ったので、デザイン的にどんな設定が出来るのかまとめます。「Google Optimiseとは」とか「テストの設定方法」ではなく、見た目をどう変更できるのかに焦点を絞ってます。

テスト設定諸々を飛ばして、いきなりデザインの設定をする「ビジュアルエディタ」に来ます。こんな感じです。

f:id:curama-tech:20180719163539p:plain

「ビジュアルエディタ」で選択できる端末はこちら

  • 標準
  • Nexus7
  • iPad
  • Galaxy S5
  • Nexus5X
  • iPhone5
  • iPhone6
  • iPhone6 Plus
  • レスポンシブ(ベータ版)

※表示を切り替えてもいつまでも表示されない時があるので、再読み込みをするとすぐ切り替わります。

では、早速デザイン的に出来ることをご紹介します。

文字を変える

1. 変更したい要素を選択して「要素を編集」

f:id:curama-tech:20180719163548p:plain

2. 「テキストを編集」か「HTMLを編集」

f:id:curama-tech:20180719163559p:plain

3. 「テキストを編集」の場合、直接テキストを編集し、「完了」

f:id:curama-tech:20180719163852p:plain

3. 「HTMLを編集」の場合、html形式でテキストを編集し、「適用」

f:id:curama-tech:20180719163913p:plain

※ 編集画面を開いて変更する度に保存が必要です、それとは別にページ単位でも保存が必要です。

※ ビジュアルエディタでは変更前との「差分を取る」のではなく、「保存した回数分の変更」が保存されます。

要素を追加する

1. 要素を追加したい箇所の前の(もしくは後の)要素を選択して「要素を編集」

f:id:curama-tech:20180719163548p:plain

2. 「HTMLを挿入」

f:id:curama-tech:20180719163938p:plain

3. HTMLを編集

選択したタグがデフォルトで表示されます

f:id:curama-tech:20180719163952p:plain

4. オプションを選択して「適用」

選択できるオプション

  • 置換・・・そのまんまの意味です
  • 挿入・・・選択した要素内先頭に挿入されます
  • 要素内末尾に追記・・・そのまんまの意味です
  • 次より前・・・とんちみたいだけど単純に選択した要素の前に追加されます
  • 後に挿入・・・そのまんまの意味です

f:id:curama-tech:20180719164005p:plain

要素を削除する

1. 削除したい要素を選択して「要素を編集」

f:id:curama-tech:20180719163548p:plain

2. 「HTMLを編集」

f:id:curama-tech:20180719164028p:plain

3. コードごと削除して「適用」

デフォルトで選択されている「置き換え」以外のオプションを選択すると空のHTML挿入が変更として保存され、要素の削除にはならないのでご注意ください。

f:id:curama-tech:20180719164046p:plain

スタイルを変更する(ページ内の同じ要素全てを変更したい場合)

1. 「< >」アイコンをクリック

f:id:curama-tech:20180719164101p:plain

2 cssを記述して保存

f:id:curama-tech:20180719164119p:plain

スタイルを変更する(ページ内の特定の要素を変更したい場合)

1. 要素を選択してパレットからスタイルを指定して保存

f:id:curama-tech:20180719164133p:plain

パレット内で指定できるスタイル

f:id:curama-tech:20180719164146p:plain

要素の順番を変える

1. 要素をドラッグ&ドロップして保存

なんて簡単。

f:id:curama-tech:20180719164159p:plain

JavaScriptを実行

今回のテストではJavaScriptの変更はなかったので、次回テストする機会があればまたご紹介させていただきます。

さいごに

いかがでしたでしょうか?html、cssの知識がなくてもだいたいのことは出来そうですね!

我々みんなのマーケットテックチームでは「くらしのマーケット」を一緒に作る仲間を募集しています!どんな環境で開発しているかはこちらの記事にまとまっています。興味がある方はぜひ気軽に連絡ください (コーポレートサイト https://www.minma.jp/

ExpressJSフレームワークの一つの単体テストの書き方

はじめに

こんにちは、みんなのマーケットのテックチームのクイです。

前回、ExpressJSフレームワークの紹介という記事で弊社のExpressJSフレームワークを利用している仕方を簡単に紹介しました。今回の続きはExpressJSフレームワークの一つの単体テスト(ユニットテスト)の書き方について紹介します。

単体テスト(ユニットテスト)とは

単体テストはプログラムを構成する部品単位(手続き型プログラミングの関数、クラスのメソッドなど)の動きが正しいかどうか検証するというテストです。

Javascriptにはmochajasmineなどの様々なテスティングフレームワークがあります。今回、mochachaisinonでユニットテストを実装します。

インストール

TypescriptとExpressJSのインストール仕方の参考はこちらです。

npm i --save-dev mocha chai sinon ts-node @types/mocha @types/chai @types/sinon

@types/sinonのバージョンによって使い方が違います。私は@types/sinon@4.3.3を使っています。

環境準備

まずはプロジェクトフォルダにtestフォルダを作成してtestフォルダの中unittestフォルダを作成します。 そして、package.jsonファイルに以下のような設定を追加します。

"scripts": {
    "test": "mocha -r ts-node/register src/**/test.ts",
},

これで、ts-nodeを用いてTypeScriptファイルを直接テストすることができます。

簡単に実装してみましょう

まず、テストしたい関数を作成します。

express/app/logic/example.ts

export function example(): string {
    return "テスト";
}

テストするファイルを宣言します。

express/test/unittest/test_example.ts

import { expect } from "chai";

import { example } from "../../app/logics/example";

describe("Example Test", () => {
    it("Example should return テスト", async () => {
        expect(example()).to.equal("テスト");
    });
});

テストを実行した結果は以下のような出力になります。

$ npm test

> re-express@1.0.0 test /xxx/xxx/xxx/express
> mocha -r ts-node/register test/**/*.ts


  Example Test
    ✓ Example should return テスト


  1 passing (24ms)

上は簡単な例ですが、Dependency Injectionのような複雑なクラスの場合はどうすれば良いでしょう。

SinonでDependency Injection使うクラスをテスト仕方

仮に二つのクラスがあるとします。 VehicleというクラスのstartVehicle()メソッドをテストしたいです。 EngineVehicleに注入されるクラスです。

express/app/logics/engine.ts

export enum EngineStatus {
    Idle = "idle",
    Running = "running"
}

export class Engine {
    private status: EngineStatus = EngineStatus.Idle;

    public getEngineStatus(): EngineStatus {
        return this.status;
    }
}

express/app/logics/vehicle.ts

import { Engine, EngineStatus } from "./engine";

export class Vehicle {
    constructor(
        private engine: Engine
    ) { }

    public getVehicle() {
        if (this.engine.getEngineStatus() === EngineStatus.Idle) {
            return "Vehicle is ready";
        } else {
            return "Vehicle is busy";
        }
    }
}

テストするファイル:

express/test/unittest/test_vehicle.ts

import { expect } from "chai";
import * as sinon from "sinon";

import { Engine, EngineStatus } from "../../app/logics/engine";
import { Vehicle } from "../../app/logics/vehicle";

describe("Test Vehicle", () => {
    let sandbox: sinon.SinonSandbox;
    let vehicle: Vehicle;

    beforeEach(() => {
        sandbox = sinon.createSandbox();
        const engine = sandbox.createStubInstance(Engine);
        engine.setEngineStatus = (status: EngineStatus): EngineStatus => { // setEngineStatusメソッドをモックする。
            return EngineStatus.Running;
        };

        vehicle = new Vehicle(engine);
    });

    afterEach(() => {
        sandbox.restore();
    });

    it("Vehicle should be busy", () => {
        expect(vehicle.getVehicle()).to.equal("Vehicle is busy");
    });
});

テストの結果:

$ npm test

> re-express@1.0.0 test /xxx/xxx/xxx/express
> mocha -r ts-node/register test/**/*.ts


  Test Vehicle
    ✓ Vehicle should be busy


  1 passing (18ms)

テストが失敗するケースを実装してみます。 テストファイルを以下のように修正してください。

it("Vehicle should be busy", async () => {
    expect(vehicle.getVehicle()).to.equal("Vehicle is ready");
});

結果:

$ npm test

> re-express@1.0.0 test /xxx/xxx/xxx/express
> mocha -r ts-node/register test/**/*.ts


  Test Vehicle
    1) Vehicle should be busy


  0 passing (45ms)
  1 failing

  1) Test Vehicle
       Vehicle should be busy:

      AssertionError: expected 'Vehicle is busy' to equal 'Vehicle is ready'
      + expected - actual

      -Vehicle is busy
      +Vehicle is ready
      
      at Object.<anonymous> (test/unittest/test_vehicle.ts:26:41)
      at next (native)
      at /Users/quynv/Documents/express/test/unittest/test_vehicle.ts:7:71
      at __awaiter (test/unittest/test_vehicle.ts:3:12)
      at Context.it (test/unittest/test_vehicle.ts:25:34)


npm ERR! Test failed.  See above for more details.

カバレッジを導入する

まず、必要なパッケージをインストールします。

npm i --save-dev nyc source-map-support

次にpackage.jsonファイルを以下のように修正します。

  "scripts": {
    "test": "nyc mocha"
  },
  ....
  "nyc": {
    "check-coverage": true,
    "extension": [
      ".ts"
    ],
    "require": [
      "ts-node/register",
      "source-map-support/register"
    ],
    "reporter": [
      "lcov",        //どこのまだ実行されないコードが見える
      "text-summary" //結果テキストのもとに見える
    ],
    "exclude": [     //除きたいフォルダ
      "controllers",
      "vendor",
      "bin",
      "test"
    ],
    "report-dir": "./test/coverage/", //テストの結果のHTMLファイルが保存する場所。
    "sourceMap": true,
    "instrument": true
  }

testフォルダの中mocha.optsファイルを作成して以下のような内容を入力します。

/test/mocha.opts

--r ts-node/register
--r source-map-support/register
--full-trace
--bail
test/**/*.ts

テストの結果:

$ npm test

> re-express@1.0.0 test /xxx/xxx/xxx/express
> nyc mocha


  Test Vehicle
    ✓ Vehicle should be busy


  1 passing (18ms)

ERROR: Coverage for lines (75%) does not meet global threshold (90%)

=============================== Coverage summary ===============================
Statements   : 75% ( 9/12 )
Branches     : 75% ( 3/4 )
Functions    : 60% ( 3/5 )
Lines        : 75% ( 9/12 )
================================================================================
npm ERR! Test failed.  See above for more details.

全部のテストが成功しましたが、カバレッジの各値が低いように見えます。

test/coverage/lcov-report/index.htmlファイルを見ましょう f:id:curama-tech:20180711181520p:plain vehicle.tsをクリックして f:id:curama-tech:20180711181540p:plain

上の結果を見るとvehicleファイルに実行していないコードがまだあることがわかります。

つまり、テストケースがまだ足りませんでした。修正しましょう。

engine.tsファイルをテストしたくない場合はファイルの上に/* istanbul ignore file */を挿入して、テストするファイルを以下のように修正します。

describe("Test Vehicle", () => {
    let sandbox: sinon.SinonSandbox;
    let vehicle: Vehicle;
    let engine: Engine;

    beforeEach(() => {
        sandbox = sinon.createSandbox();
        engine = sandbox.createStubInstance(Engine);
        engine.getEngineStatus = (): EngineStatus => {
            return EngineStatus.Running;
        };

        vehicle = new Vehicle(engine);
    });

    afterEach(() => {
        sandbox.restore();
    });

    it("Vehicle should be busy", async () => {
        expect(vehicle.getVehicle()).to.equal("Vehicle is busy");
    });

    it("Vehicle should be ready", async () => {
        engine.getEngineStatus = (): EngineStatus => {
            return EngineStatus.Idle;
        };

        vehicle = new Vehicle(engine);
        expect(vehicle.getVehicle()).to.equal("Vehicle is ready");
    });
});

修正したテストの結果

$ npm test

> re-express@1.0.0 test /xxx/xxx/xxx/express
> nyc mocha


  Test Vehicle
    ✓ Vehicle should be busy
    ✓ Vehicle should be ready


  2 passing (15ms)

=============================== Coverage summary ===============================
Statements   : 100% ( 6/6 )
Branches     : 100% ( 2/2 )
Functions    : 100% ( 2/2 )
Lines        : 100% ( 6/6 )
================================================================================

f:id:curama-tech:20180711181529p:plain f:id:curama-tech:20180711181545p:plain

以上です。

最後に

みんなのマーケット達と一緒に働く仲間を募集しています!。興味がある方はぜひ気軽に連絡ください (コーポレートサイト https://www.minma.jp/ )。

エンジニア紹介 Vol.1

f:id:curama-tech:20180706112744j:plain

こんにちは。ディレクターの塚本です。

今回は同じチームのエンジニアを紹介します!チームには5名のエンジニアがいて、日々アプリやWebの設計・開発を行っています。それではさっそくまいりましょう。

時々関西弁を話すネパール人、カーキ・スシャーン

  • <エンジニア歴>4年
  • <得意な言語>Typescript、 場合によってPython
  • <興味のある技術と理由>Full stack data science。Data scienceに興味があるけど、単純に誰からデータもらって分析だけじゃなくて、こんなデータがあれば面白いかもって思ったら自分でData engineeringできたら楽しそうだから。
  • <みんマの好きなところ>自由な感じが好き
  • <みんマに入社した理由>会社が好き + 日本で働いてみたかった

f:id:curama-tech:20180706112802j:plain

カーキさんは日本で育ったんじゃないかと思うほど流暢な日本語を話しますが、漢字は大嫌いで苦手です(今はわかりませんが数年前は弁当屋のメニューにある漢字が読めず、毎回唐揚げ弁当を注文していました)。また、誰に対しても優しいうえ、端正な顔立ちで会社の人気者です。

猫をこよなく愛する開発部門の父、のりすけ

  • <エンジニア歴>どこから数えればいいかわからなかったけど8年くらい
  • <好きな言語>Haskell, Typescript, Rust
  • <興味のある技術と理由>Haskell。値がなにかではなくこの型はなにが出来るかを考え、強力な型システムでやりたいことを抽象化し設計できる。
  • <みんマの好きなところ>猫がいる
  • <みんマに入社した理由>猫がいる
  • <みんマの最初の印象と実際>最初: 猫がいる、実際: 猫がいる

f:id:curama-tech:20180706112806j:plain

のりすけさんは開発に関する知識や経験が豊富で他のエンジニアからとても頼りにされています。仕事に関しては非常に知的で尊敬していますが、仕事以外の話になると途端にアホになることがあります。そのギャップがたまりません。

天才かよ、ヤン・ヤン

  • <エンジニア歴>5年くらい(大学院の時教授の会社でフルタイム2年半+日本で1年SE+みんマで2年未満)
  • <好きな言語>Kotlin
  • <興味のある技術と理由>最近はFlutterに気になります。エンジニアに対して、 Write once, run everywhere はいつも吸引力がありますから。
  • <エンジニアになった理由>金融系やSE管理の仕事もそれぞれ一年間試したことがありますが、やはりもの作りが一番楽しいと思います。
  • <みんマの好きなところ>エンジニアとして好きなところは三つがあって、自由と自由そして自由です。

f:id:curama-tech:20180706112818j:plain

ヤンさんは中国出身です。「次これをお願いしたいんですけど〜」と言うと、「もう終わってます」という会話が何度なされたことか。仕事が早い、かつ丁寧。天才かよ。

とにかく前へ!Duy 

  • <エンジニア歴>一年間ぐらいWebのエンジニアとして、プログラミングしています。一年半ほどSwiftでiOSのアプリを開発しています。
  • <好きな言語>pythonとSwiftです。
  • <興味のある技術と理由>データ分析と機械学習。データを分析して、機械をトレーニングして、ユーザーの行動を推測するのは引力があります。そして、実際にこの技術だとこれからたくさん分野に応用できると思います。
  • <エンジニアになった理由>技術のプロダクトとソフトウェアに興味があって、自分で技術のプロダクトを作りたいと思います。
  • <こんな人と働きたい>創造性がある人と技術のスキールを持っている人。

f:id:curama-tech:20180706112754j:plain

Duyくんはベトナム出身です。持ち前のコミュ力を活かして日本語も開発技術もぐんぐん吸収していきます。これまでDuyくんといっしょに仕事をする機会が多かったのですが、分からなくてもミスってもとにかく前へ!前へ!という気持ちをとても感じます。

困ったら笑う!Tuyen

  • <エンジニア歴>Webを開発(1年半)+みんま(1年半)
  • <好きな言語>Python, Typescript
  • <興味のある技術と理由>最近、設計システムに興味があります。開発するとき、いつもいい設計を考える必要ですから、もっと勉強したいです。
  • <エンジニアになった理由>ソフトウェア、ウェブサイトを作れたら、とても嬉しく思ったからです。
  • <みんマの好きなところ>フレックスタイム

f:id:curama-tech:20180706112812j:plain

TuyenくんもDuyくんと同じベトナム出身です。日本語でのコミニュケーションがうまくいかない時は大体笑ってごまかします。その笑顔は人を和ませる力を持っているので、かなりキャラ得です。Tuyenくんはできる素振りは一切見せずに実はアプリの開発ができたり数学が得意だったりと、まだ明かされてない特技を秘めているような気がします。

さいごに

いかがでしたでしょうか?
もっとエンジニアの話を聞いてみたいと思った方はぜひお気軽にご連絡ください!(コーポレートサイト https://www.minma.jp/

Implementing a simple pipeline with Typescript

Implementing a simple pipeline with Typescript

Hi, this is Sushant from the Minma, Inc. tech-team and today I would like to demonstrate to you the power of Typescript. In my last post, I introduced you to Apache Airflow and demonstrated the implementation of a pipeline to create a pizza using Airflow. Today, we will do the same, but with Typescript. The goal is to build a strongly typed pipeline utilizing Typescript's type system and create a variety of pizzas with it.

As you can probably tell, I am somewhat obsessed to pipelines. To me, pipelines are a great way to write code for some business process. Add static typing to pipelines and you get a pipeline that is robust, modular and flexible and readable. Let's say I work for an e-commerce site (which I actually do ;)) and we just got reports that our users never get any welcome email upon registration. Not knowing if it's a bug in the system or if we ever send emails in the first place, my product manager asks me if we are sending welcome emails when user registration is complete. Being a relatively new programmer in the company, I have no other way to answer that than go through the source code for and find out what happens during user registration. A lot of time this would involve going through a lot of code, jumping around from function to function trying to get to code that relates to the end of the registration process. If the same user registration process were implemented as a pipeline, I would be able to get a top level view of what goes on when a user registers at our site just by looking at the pipeline's steps. Chances are, there could actually be a step in the pipeline that reads "sendWelcomeEmail"! Even if that's not the case, I could just look at the pipeline and choose a step in the pipeline that I think could have a connection to emails and see what's going on.

Enough talk! Let's write ourselves a pipeline with Typescript.

Here's what we are gonna do: - a. Implement a function that lets us create pipeline for any workflow. - b. Use the function to create a pipeline for creating pizzas based on a user's order. - c. Use the pipeline created in step b. to create various kinds of pizzas.

The source code for the pipeline is available in github

a. Implement a function that lets us create pipeline for any workflow.

We want our module to take in functions that represent each step in our pipeline and return a single composed function that performs those steps in order.

If f(x), g(x), h(x) and i(x) represent each step in our pipeline, the definition of our workflow would be

            j(x) = i ( h ( g ( f ( x ) ) ) ) 

So, whenever we want to run our workflow, we don't directly call f(x), g(x), h(x), and i(x) in order every single time. All we need to do is call j(x) and the pipeline runs as expected.

Here is the definition in typescript:

export type Pipeable<Args, ReturnType> = (args: Args) => ReturnType;

export function createPipeline<X, A>(f: Pipeable<X, A>): Pipeable<X, A>;
export function createPipeline<X, A, B>(f: Pipeable<X, A>, g: Pipeable<A, B>): Pipeable<X, B>;
export function createPipeline<X, A, B, C>(f: Pipeable<X, A>, g: Pipeable<A, B>, h: Pipeable<B, C>): Pipeable<X, C>;
export function createPipeline<X, A, B, C, D>(f: Pipeable<X, A>, g: Pipeable<A, B>, h: Pipeable<B, C>, i: Pipeable<C, D>): Pipeable<X, D>;
export function createPipeline<X, A, B, C, D, E>(f: Pipeable<X, A>, g: Pipeable<A, B>, h: Pipeable<B, C>, i: Pipeable<C, D>, j: Pipeable<D, E>): Pipeable<X, E>;
export function createPipeline<X, A, B, C, D, E, F>(f: Pipeable<X, A>, g: Pipeable<A, B>, h: Pipeable<B, C>, i: Pipeable<C, D>, j: Pipeable<D, E>, k: Pipeable<E, F>): Pipeable<X, F>;
export function createPipeline<X, A, B, C, D, E, F>( 
    f: Pipeable<X, A>, 
    g?: Pipeable<A, B>, 
    h?: Pipeable<B, C>, 
    i?: Pipeable<C, D>, 
    j?: Pipeable<D, E>, 
    k?: Pipeable<E, F>): 
    Pipeable<X, A> | 
    Pipeable<X, B> |
    Pipeable<X, C> | 
    Pipeable<X, D> | 
    Pipeable<X, E> | 
    Pipeable<X, F> {
        if (!!k) {
            return (args) => k(j!(i!(h!(g!(f(args))))));
        } else if (!!j) {
            return (args) => j(i!(h!(g!(f(args)))));
        } else if (!!i) {
            return (args) => i(h!(g!(f(args))));
        } else if (!!h) {
           return (args) => h(g!(f(args)));
        } else if (!!g) {
            return (args) => g(f(args));
        } else {
            return (args) => f(args);
        }
}

Let's break this down one by one.

export type Pipeable<Args, ReturnType> = (args: Args) => ReturnType;

Pipable<Args, ReturnType> is a generic type for any function that takes in arguments of type Args and returns something of type ReturnType. We will be using this to generate your compose function.

Our main function createPipeline() has six overloads, one for each number of arguments passed to it. This implies that our create pipeline function can handle workflows having no more than 6 steps.
Let's look at one of these overloads:

export function createPipeline<X, A, B, C>(f: Pipeable<X, A>, g: Pipeable<A, B>, h: Pipeable<B, C>): Pipeable<X, C>;

If we were to visualize what createPipeline does, it would look something like this:

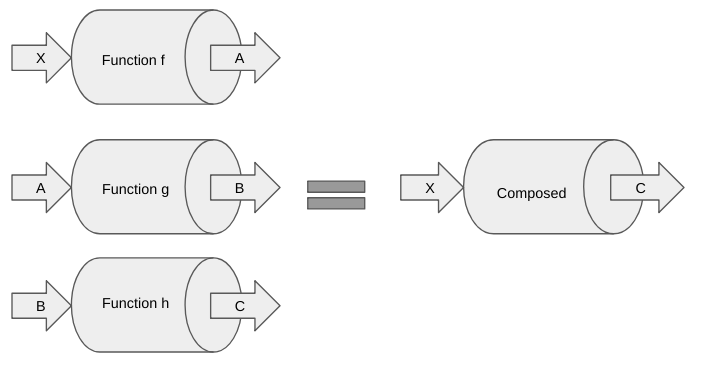
It takes in 3 functions f, g, and h and returns a new composed function that does the same thing as the three functions combined. Notice that the input of the composed function is the same as the input of the first step of the pipeline and the output is the same as the output of the last step of the pipeline. What this means is, instead of running f, g, and h in order everytime, we can just run this composed function every time we want to execute our pipeline and be assured that the result will be the same as running f, g and h combined.

if (!!k) {
    return (args) => k(j!(i!(h!(g!(f(args))))));
} else if (!!j) {
    return (args) => j(i!(h!(g!(f(args)))));
} else if (!!i) {
    return (args) => i(h!(g!(f(args))));
} else if (!!h) {
   return (args) => h(g!(f(args)));
} else if (!!g) {
    return (args) => g(f(args));
} else {
    return (args) => f(args);
}

↑This is not code that I am proud of, but in order to ensure that the types are inferred correctly, I had to write it this way.

What I really wanted to do was to implement a reducer like so

 const reducer: <M, N, O>(f: Pipeable<M, N>, g: Pipeable<N, O>) => Pipeable<M, O> = (f, g) => (x) => g(f(x));

and use the reducer function to reduce an array of functions like

[f, g, h, i, j, k].reduce(reducer)

, but sadly Typescript wasn't so forigiving. If anybody has a more elegant solution, please enlighten me!

b. Use the function to create a pipeline for creating pizzas based on a user's order.

This is where we build the building blocks of our pipeline. Let's first define what an order looks like:

export namespace OrderOptions {
    export enum Crust {
        HandTossed = "HandTossed",
        Pan = "Pan",
        ThinCrust = "ThinCrust"
    }

    export enum Sauce {
        Tomato = "Tomato"
    }

    export enum Topping {
        Ham = "Ham",
        Cheese = "Cheese",
        Pineapple = "Pineapple",
        Mushroom = "Mushroom",
        Pepperoni = "Pepperoni",
        ItalianSausage = "Italian Sausage",
        Olives = "Olives",
        Jalapeno = "Jalapeno",
        GreenPepper = "Green Pepper",
        Anchovies = "Anchovies",
        Onion = "Onion"
    }
}

export interface Order {
    crust: OrderOptions.Crust;
    sauce: OrderOptions.Sauce;
    toppings: OrderOptions.Topping[];
}

Customers can select from 3 types of crusts, sadly just one type of sauce and many different kinds of toppings. Our order object, as is obvious from the model, will have a value for crust, sauce and an array of toppings;

Our pipeline for creating a pizza will have the following 4 steps:

  1. Prepare crust.
  2. Apply sauce.
  3. Add toppings.
  4. Bake in oven.

Note that each step is dependent on the previous step. i.e. We cannot apply sauce if you have no crust. We don't add toppings if the sauce hasn't been applied yet, and so on. Therefore, we define state for our pizza as follows:

type CrustPrepared = { crust: OrderOptions.Crust };
type SauceApplied = CrustPrepared & { sauce: OrderOptions.Sauce };
type ToppingsAdded = SauceApplied & { toppings: OrderOptions.Topping[] }
type FreshlyBakedPizza = ToppingsAdded & { baked: true };

type PizzaState = CrustPrepared | SauceApplied | ToppingsAdded | FreshlyBakedPizza;

As we can see, if our pizza is in the SauceAppliedstate, it will have properties from the CrustPrepared state and have one more property for the type of sauce applied. Note that if our pizza is in the ToppingsAddedstate, it will have properties from both the CrustPrepared state the SauceAdded state in addition to the property for the types of toppings used.

To make life easier, we define following type to represent the output at every step in the pipeline:

interface Output<CurrentState extends PizzaState> {
    readonly order: Order,
    pizzaState: CurrentState,
    events: string[];
}

The order property represents the order made by the customer. We don't want the order to suddenly change when the pizza is half done, so we set it as readonly. The pizzaState property represents the current state in the pipeline. We also have an events property for logging purposes so that we can see that all the steps in the pipeline were properly executed and in order.

OK, let's start writing code for each step of the pipeline:

1. Prepare crust.

Our prepareCrust step looks like this:

const prepareCrust: Pipeable<Order, Output<CrustPrepared>> = (order) => {
    return { 
        order: order,
        pizzaState: { crust: order.crust },
        events: [`Preparing ${order.crust} pizza crust......DONE`]
    }
}

Remember that each function passed to our createPipeline function has type Pipeable. Thus, we define our prepareCrust function as Pipeable. We are not doing anything crazy. All we are doing is take the order, and set the pizzaState with crust set to the crust ordered by the user. We also add a message to log that this step completed successfully.

2. Apply sauce.

Similarly, our applySauce step looks like this:

const applySauce: Pipeable<Output<CrustPrepared>, Output<SauceApplied>> = (state) => {
    return { 
        ...state,
        pizzaState: { ...state.pizzaState, sauce: state.order.sauce },
        events: [...state.events, `Applying ${state.order.sauce} sauce......DONE`]
    }
}

Things to note:

  • This function takes the output of the prepareCrust step as an argument.
  • We are using the spread operator ...state to first create a copy of the current state, and then update the state in the copy with the new state.

3. Add toppings.

Our addToppings step looks like this:

const applyToppings: Pipeable<Output<SauceApplied>, Output<ToppingsAdded>> = (state) => {
    return { 
        ...state,
        pizzaState: { ...state.pizzaState, toppings: state.order.toppings },
        events: [...state.events, `Adding ${state.order.toppings.join(", ")} toppings......DONE`]
    }
}

Nothing special here, similar to the applySauce.

4. Bake in oven.

Finally, our bakeInOven step looks something like this:

const bakeInOven: Pipeable<Output<ToppingsAdded>, Output<FreshlyBakedPizza>> = (state) => {
    return { 
        ...state,
        pizzaState: { ...state.pizzaState, baked: true },
        events: [...state.events, "Baking in oven......DONE", "Freshly baked pizza ready!!!!"]
    }
}

Now that we have functions for each of our steps, let's create our pipeline:

export const createPizza = createPipeline(
    prepareCrust,
    applySauce,
    applyToppings,
    bakeInOven
);

We finally get to use our createPipeline function to create our pizza pipeline. Note that if we tried to change the order of the steps here, Typescript would not let us! This is where all the hard work of writing the overloads for createPipeline pays off. This is the part that also shows the readability of pipelines. I could just look at this piece of code and have an idea about what steps are involved in creating a pizza. Of course, good naming goes hand in hand for that to work.

Notice that we are not exporting the individual steps. We are just exporting the composed createPizza function. So, if somebody wants to create a pizza, they have no choice but to adhere to our createPizza pipeline. We can extend this concept and do things differently. Instead of having a generic createPizza for all types of pizzas, we could have a pipeline for each type of pizza we offer such as createHawaiianPizza or createMeatLoversPizza and so on. The possibilities are endless!

Now that we have our pipeline ready, let's order some pizzas:

const handTossedHawaiianPizza = createPizza({
    crust: OrderOptions.Crust.HandTossed,
    sauce: OrderOptions.Sauce.Tomato,
    toppings: [OrderOptions.Topping.Ham, OrderOptions.Topping.Pineapple, OrderOptions.Topping.Cheese]
})

const thinCrustHawaiianPizza = createPizza({
    crust: OrderOptions.Crust.ThinCrust,
    sauce: OrderOptions.Sauce.Tomato,
    toppings: [OrderOptions.Topping.Ham, OrderOptions.Topping.Pineapple, OrderOptions.Topping.Cheese]
})

const meatLoversPizza = createPizza({
    crust: OrderOptions.Crust.Pan,
    sauce: OrderOptions.Sauce.Tomato,
    toppings: [OrderOptions.Topping.ItalianSausage, OrderOptions.Topping.Ham, OrderOptions.Topping.Pepperoni ,OrderOptions.Topping.Cheese ]
})


console.log("######### Hand Tossed Hawaiian pizza ##########")
console.log(handTossedHawaiianPizza)
console.log("###############################################\n")

console.log("######### Thin CrustHawaiian pizza ############")
console.log(thinCrustHawaiianPizza)
console.log("###############################################\n")

console.log("############# Meat Lovers pizza ###########")
console.log(meatLoversPizza)
console.log("###############################################\n")

All we are doing is passing an Order object to our createPizza pipeline and logging the results to the console.

To see if it works, compile with tsc and run.

If using the source code from github (assuming that Typescript is installed), you can test it like so:

# Inside the src directory
$ tsc && node bin/orderPizza.js

Output:

######### Hand Tossed Hawaiian pizza ##########
{ order:
   { crust: 'HandTossed',
     sauce: 'Tomato',
     toppings: [ 'Ham', 'Pineapple', 'Cheese' ] },
  pizzaState:
   { crust: 'HandTossed',
     sauce: 'Tomato',
     toppings: [ 'Ham', 'Pineapple', 'Cheese' ],
     baked: true },
  events:
   [ 'Preparing HandTossed pizza crust......DONE',
     'Applying Tomato sauce......DONE',
     'Adding Ham, Pineapple, Cheese toppings......DONE',
     'Baking in oven......DONE',
     'Freshly baked pizza ready!!!!' ] }
###############################################

######### Thin CrustHawaiian pizza ############
{ order:
   { crust: 'ThinCrust',
     sauce: 'Tomato',
     toppings: [ 'Ham', 'Pineapple', 'Cheese' ] },
  pizzaState:
   { crust: 'ThinCrust',
     sauce: 'Tomato',
     toppings: [ 'Ham', 'Pineapple', 'Cheese' ],
     baked: true },
  events:
   [ 'Preparing ThinCrust pizza crust......DONE',
     'Applying Tomato sauce......DONE',
     'Adding Ham, Pineapple, Cheese toppings......DONE',
     'Baking in oven......DONE',
     'Freshly baked pizza ready!!!!' ] }
###############################################

############# Meat Lovers pizza ###########
{ order:
   { crust: 'Pan',
     sauce: 'Tomato',
     toppings: [ 'Italian Sausage', 'Ham', 'Pepperoni', 'Cheese' ] },
  pizzaState:
   { crust: 'Pan',
     sauce: 'Tomato',
     toppings: [ 'Italian Sausage', 'Ham', 'Pepperoni', 'Cheese' ],
     baked: true },
  events:
   [ 'Preparing Pan pizza crust......DONE',
     'Applying Tomato sauce......DONE',
     'Adding Italian Sausage, Ham, Pepperoni, Cheese toppings......DONE',
     'Baking in oven......DONE',
     'Freshly baked pizza ready!!!!' ] }
###############################################

And that's it for this post! I hope I could demonstrate the usefulness of pipelines, especially with Typescript. I'm sure there are better ways to implement the same (and I would be all ears for better ways). Hopefully in a future post, I will be able to demonstrate a better way to implement the same pipeline, perhaps with some error handling and much cleaner code!

PS: We are hiring! For those interested, feel free to apply here . At least conversational Japanese proficiency is required.

Pythonでメモリ使用量を改善してみる

こんにちはエンジニアののりすけです。

みんなのマーケットではPythonを使用したサービスを動かしています。以前より使用メモリが異常に大きいサービスがあるため、SREチームからなんとかしてほしいとの依頼が来ています。

今回はサンプルコードを使ってPythonのメモリプロファイルを行いながら、省メモリなアプリケーションをどのように実装するか検証したいと思います。

利用するツール

  • memory_profiler
  • matplotlib

上記のライブラリをpip installでインストールしておきます。

memory_profilerの基本的な使い方

まず使い方を確認します。以下のように確認したい処理にデコレータ@profileを記述します。

from memory_profiler import profile


def large_integer_list():
    return [i for i in range(0,10000000)]


@profile
def main():
    result = sum(large_integer_list())
    print(result)

if __name__ == '__main__':
    main()

上記のコードを実行すると以下のような結果が出力されます。

$ python sample1.py
49999995000000
Filename: sample1.py

Line #    Mem usage    Increment   Line Contents
================================================
     8     12.4 MiB     12.4 MiB   @profile
     9                             def main():
    10     17.0 MiB      4.6 MiB       result = sum(large_integer_list())
    11     17.0 MiB      0.0 MiB       print(result)

左にあるMem usageが該当の行が評価された時点でのメモリ使用量、Incrementが評価された事による使用量の増加を表しています。今回の例の場合、listに入っている数字の合計を算出した時点で4.6MiB増えたことになっています。

この結果を少し考えたいと思います。

もともとの想定では大きなリストを作成し、メモリを大きく使うことを想定していましたが、このプロファイル結果では4.6MiBしか増えていないように見えてしまいます。しかし、よく考えるとこの部分はsum([int]) を評価した結果が+4.6MiBであり、sum関数を処理する上で不要になった情報は削除されていっているように考えられます。

今度は時系列に推移を見たいため、memory_profilermatplotlibを使って実行時のメモリ使用量を可視化します。

$ mprof run sample1.py
$ mprof plot

このようにmprofコマンドを利用するとグラフ化することができます。グラフから最大400MiB近くまでメモリを使用したことがわかりました。

f:id:curama-tech:20180621220646p:plain

次はこの400MiB近くまで使用してしまうこのコードを改善します。

メモリ使用量の改善

改善案としてlarge_integer_list()関数をリスト型ではなく、ジェネレータを返すように変更します。

from memory_profiler import profile

def large_integer_generator():
    # ここをGenerator式に変更
    return (i for i in range(0,10000000))


@profile
def main():
    result = sum(large_integer_generator())
    print(result)

if __name__ == '__main__':
    main()

実行結果

mprof run sample1.py
mprof: Sampling memory every 0.1s
running as a Python program...
49999995000000
Filename: sample1.py

Line #    Mem usage    Increment   Line Contents
================================================
     8     12.8 MiB     12.8 MiB   @profile
     9                             def main():
    10     12.8 MiB      0.0 MiB       result = sum(large_integer_generator())
    11     12.8 MiB      0.0 MiB       print(result)

f:id:curama-tech:20180621220837p:plain

今度はグラフ上もメモリ使用量が劇的に減っていることがわかります。ジェネレータを使うことで一度に大量のデータを確保することなく一つずつ処理しているため省メモリで処理することができます。

しかし、グラフのx軸を確認すると20秒を超える実行時間になっています。先程のリストを利用した場合は10秒を切る実行時間だったのに対して2倍以上遅い。。。

実行速度の改善

先程のコードではメモリの使用量は改善できましたが、今度は実行速度が問題になってしまいました。原因として考えられるのはジェネレータではyieldするたびに値の評価が行われます。評価回数があまりに多くなってしまったため速度が低下したことが考えられます。

上記の問題点を改善したコードが以下になります。

from memory_profiler import profile
# Iteratorに対する便利な関数がまとまったモジュール
from itertools import (islice, chain)

# iteratorをchunkサイズに分割する関数
def chunks(iterable, chunk_size):
    iterator = iter(iterable)
    chunk = tuple(islice(iterator, chunk_size))
    while chunk:
        yield list(chunk)
        chunk = tuple(islice(iterator, chunk_size))

def large_integer_generator():
    chunk_size = 10000
    # chunk毎にsumを行う
    for chunk in chain(chunks(range(0,10000000), chunk_size)):
        yield sum(chunk)

@profile
def main():
    result = sum(large_integer_generator())
    print(result)

if __name__ == '__main__':
    main()

実行結果

mprof run sample1.py
mprof: Sampling memory every 0.1s
running as a Python program...
49999995000000
Filename: sample1.py

Line #    Mem usage    Increment   Line Contents
================================================
    19     12.6 MiB     12.6 MiB   @profile
    20                             def main():
    21     15.0 MiB      2.4 MiB       result = sum(large_integer_generator())
    22     15.0 MiB      0.0 MiB       print(result)

f:id:curama-tech:20180621220855p:plain

前回のコードよりchunk分のメモリ使用量は増えていますが、速度が劇的に改善されました。

最後に

今回の検証ではうまくメモリ使用量/実行速度の改善を行うことができました。実際のサービスで同様に改善できる部分があるかは、これから確認しなければいけませんが、今後の実装においても良い検証ができたかと思います。

我々みんなのマーケットテックチームでは「くらしのマーケット」を一緒に作る仲間を募集しています!興味がある方はぜひ気軽に連絡ください (コーポレートサイト https://www.minma.jp/ ) 次回はエンジニアのカーキくんの予定です。